Obtaining, installing, and validating QMCPACK
This section describes how to obtain, build, and validate QMCPACK. This process is designed to be as simple as possible and should be no harder than building a modern plane-wave density functional theory code such as Quantum ESPRESSO, QBox, or VASP. Parallel builds enable a complete compilation in under 2 minutes on a fast multicore system. If you are unfamiliar with building codes we suggest working with your system administrator to install QMCPACK.
Installation steps
To install QMCPACK, follow the steps below. Full details of each step are given in the referenced sections.
Download the source code from Obtaining the latest release version or Obtaining the latest development version.
Verify that you have the required compilers, libraries, and tools installed (Prerequisites).
If you will use Quantum ESPRESSO, download and patch it. The patch adds the pw2qmcpack utility (Installing Quantum ESPRESSO and pw2qmcpack).
Run the cmake configure step and build with make (Building with CMake and Quick build instructions (try first)). Examples for common systems are given in Installation instructions for common workstations and supercomputers. To activate workflow tests for Quantum ESPRESSO, RMG, or PYSCF, be sure to specify QE_BIN, RMG_BIN, or ensure that the python modules are available when cmake is run.
Run the tests to verify QMCPACK (Testing and validation of QMCPACK).
Hints for high performance are in How to build the fastest executable version of QMCPACK. Troubleshooting suggestions are in Troubleshooting the installation.
Note that there are two different QMCPACK executables that can be produced: the general one, which is the default, and the “complex” version, which supports periodic calculations at arbitrary twist angles and k-points. This second version is enabled via a cmake configuration parameter (see Configuration Options). The general version supports only wavefunctions that can be made real. If you run a calculation that needs the complex version, QMCPACK will stop and inform you.
Obtaining the latest release version
Major releases of QMCPACK are distributed from http://www.qmcpack.org. Because these versions undergo the most testing, we encourage using them for all production calculations unless there are specific reasons not to do so.
Releases are usually compressed tar files that indicate the version number, date, and often the source code revision control number corresponding to the release. To obtain the latest release:
Download the latest QMCPACK distribution from http://www.qmcpack.org.
Untar the archive (e.g.,
tar xvf qmcpack_v1.3.tar.gz).
Releases can also be obtained from the ‘master’ branch of the QMCPACK git repository, similar to obtaining the development version (Obtaining the latest development version).
Obtaining the latest development version
The most recent development version of QMCPACK can be obtained anonymously via
git clone https://github.com/QMCPACK/qmcpack.git
Once checked out, updates can be made via the standard git pull.
The ‘develop’ branch of the git repository contains the day-to-day development source with the latest updates, bug fixes, etc. This version might be useful for updates to the build system to support new machines, for support of the latest versions of Quantum ESPRESSO, or for updates to the documentation. Note that the development version might not be fully consistent with the online documentation. We attempt to keep the development version fully working. However, please be sure to run tests and compare with previous release versions before using for any serious calculations. We try to keep bugs out, but occasionally they crawl in! Reports of any breakages are appreciated.
Prerequisites
The following items are required to build QMCPACK. For workstations, these are available via the standard package manager. On shared supercomputers this software is usually installed by default and is often accessed via a modules environment—check your system documentation.
Use of the latest versions of all compilers and libraries is strongly encouraged but not absolutely essential. Generally, newer versions are faster; see How to build the fastest executable version of QMCPACK for performance suggestions. Versions of compilers over two years old are unsupported and untested by the developers although they may still work.
C/C++ compilers such as GNU, Clang, Intel, and IBM XL. C++ compilers are required to support the C++ 17 standard. Use of recent (“current year version”) compilers is strongly encouraged.
An MPI library such as OpenMPI (http://open-mpi.org) or a vendor-optimized MPI.
BLAS/LAPACK, numerical, and linear algebra libraries. Use platform-optimized libraries where available, such as Intel MKL. ATLAS or other optimized open source libraries can also be used (http://math-atlas.sourceforge.net).
CMake, build utility (http://www.cmake.org).
Libxml2, XML parser (http://xmlsoft.org).
HDF5, portable I/O library (http://www.hdfgroup.org/HDF5/). Good performance at large scale requires parallel version \(>=\) 1.10.
BOOST, peer-reviewed portable C++ source libraries (http://www.boost.org). Minimum version is 1.61.0.
FFTW, FFT library (http://www.fftw.org/).
To build the GPU accelerated version of QMCPACK, an installation of NVIDIA CUDA development tools is required. Ensure that this is compatible with the C and C++ compiler versions you plan to use. Supported versions are included in the NVIDIA release notes.
Many of the utilities provided with QMCPACK require Python (v3). The numpy and matplotlib libraries are required for full functionality.
C++ 17 standard library
The C++ standard consists of language features—which are implemented in the compiler—and library features—which are implemented in the standard library. GCC includes its own standard library and headers, but many compilers do not and instead reuse those from an existing GCC install. Depending on setup and installation, some of these compilers might not default to using a GCC with C++ 17 headers (e.g., GCC 4.8 is common as a base system compiler, but its standard library only supports C++ 11).
The symptom of having header files that do not support the C++ 17 standard is usually compile errors involving standard include header files. Look for the GCC library version, which should be present in the path to the include file in the error message, and ensure that it is 8.1 or greater. To avoid these errors occurring at compile time, QMCPACK tests for a C++ 17 standard library during configuration and will halt with an error if one is not found.
At sites that use modules, it is often sufficient to simply load a newer GCC.
Intel compiler
The Intel compiler version must be 19 or newer due to use of C++17 and bugs and limitations in earlier versions.
If a newer GCC is needed, the -cxxlib option can be used to point to a different
GCC installation. (Alternately, the -gcc-name or -gxx-name options can be used.) Be sure to
pass this flag to the C compiler in addition to the C++ compiler. This
is necessary because CMake extracts some library paths from the C
compiler, and those paths usually also contain to the C++ library. The
symptom of this problem is C++ 17 standard library functions not found
at link time.
Building with CMake
The build system for QMCPACK is based on CMake. It will autoconfigure based on the detected compilers and libraries. The most recent version of CMake has the best detection for the greatest variety of systems. The minimum required version of CMake is 3.17.0. Most computer installations have a sufficiently recent CMake, though it might not be the default.
If no appropriate version CMake is available, building it from source is
straightforward. Download a version from https://cmake.org/download/ and
unpack the files. Run ./bootstrap from the CMake directory, and then run make when that
finishes. The resulting CMake executable will be in the directory. The
executable can be run directly from that location.
Previously, QMCPACK made extensive use of toolchains, but the build system has since been updated to eliminate the use of toolchain files for most cases. The build system is verified to work with GNU, Intel, and IBM XLC compilers. Specific compile options can be specified either through specific environment or CMake variables. When the libraries are installed in standard locations (e.g., /usr, /usr/local), there is no need to set environment or CMake variables for the packages.
Quick build instructions (try first)
If you are feeling lucky and are on a standard UNIX-like system such as a Linux workstation, the following might quickly give a working QMCPACK:
The safest quick build option is to specify the C and C++ compilers through their MPI wrappers. Here we use Intel MPI and Intel compilers. Move to the build directory, run CMake, and make
cd build
cmake -DCMAKE_C_COMPILER=mpiicc -DCMAKE_CXX_COMPILER=mpiicpc ..
make -j 8
You can increase the “8” to the number of cores on your system for faster builds. Substitute mpicc and mpicxx or other wrapped compiler names to suit your system. For example, with OpenMPI use
cd build
cmake -DCMAKE_C_COMPILER=mpicc -DCMAKE_CXX_COMPILER=mpicxx ..
make -j 8
If you are feeling particularly lucky, you can skip the compiler specification:
cd build
cmake ..
make -j 8
The complexities of modern computer hardware and software systems are such that you should check that the autoconfiguration system has made good choices and picked optimized libraries and compiler settings before doing significant production. That is, check the following details. We give examples for a number of common systems in Installation instructions for common workstations and supercomputers.
Environment variables
A number of environment variables affect the build. In particular they can control the default paths for libraries, the default compilers, etc. The list of environment variables is given below:
CXX              C++ compiler
CC               C Compiler
MKL_ROOT         Path for MKL
HDF5_ROOT        Path for HDF5
BOOST_ROOT       Path for Boost
FFTW_HOME        Path for FFTW
Configuration Options
In addition to reading the environment variables, CMake provides a number of optional variables that can be set to control the build and configure steps. When passed to CMake, these variables will take precedent over the environment and default variables. To set them, add -D FLAG=VALUE to the configure line between the CMake command and the path to the source directory.
Key QMCPACK build options
QMC_COMPLEX           Build the complex (general twist/k-point) version (1:yes, 0:no)
QMC_MIXED_PRECISION   Build the mixed precision (mixing double/float) version
                      (1:yes (QMC_CUDA=1 default), 0:no (QMC_CUDA=0 default)).
                      Mixed precision calculations can be signifiantly faster but should be
                      carefully checked validated against full double precision runs,
                      particularly for large electron counts.
ENABLE_OFFLOAD        ON/OFF(default). Enable OpenMP target offload for GPU acceleration.
QMC_CUDA              Enable legacy CUDA code path for NVIDIA GPU acceleration (1:yes, 0:no)
ENABLE_CUDA           ON/OFF(default). Enable CUDA code path for NVIDIA GPU acceleration.
                      Production quality for AFQMC and real-space performance portable implementation.
                      Use CMAKE_CUDA_ARCHITECTURES, default 70, to set the actual GPU architecture.
QMC_CUDA2HIP          ON/OFF(default). To be set ON, it requires either QMC_CUDA or ENABLE_CUDA to be ON.
                      Compile CUDA source code as HIP and use ROCm libraries for AMD GPUs.
ENABLE_SYCL           ON/OFF(default). Enable SYCL code path. Only support Intel GPUs and OneAPI compilers.
General build options
CMAKE_BUILD_TYPE     A variable which controls the type of build
                     (defaults to Release). Possible values are:
                     None (Do not set debug/optmize flags, use
                     CMAKE_C_FLAGS or CMAKE_CXX_FLAGS)
                     Debug (create a debug build)
                     Release (create a release/optimized build)
                     RelWithDebInfo (create a release/optimized build with debug info)
                     MinSizeRel (create an executable optimized for size)
CMAKE_SYSTEM_NAME    Set value to CrayLinuxEnvironment when cross-compiling in Cray Programming Environment.
CMAKE_C_COMPILER     Set the C compiler
CMAKE_CXX_COMPILER   Set the C++ compiler
CMAKE_C_FLAGS        Set the C flags.  Note: to prevent default
                     debug/release flags from being used, set the CMAKE_BUILD_TYPE=None
                     Also supported: CMAKE_C_FLAGS_DEBUG,
                     CMAKE_C_FLAGS_RELEASE, and CMAKE_C_FLAGS_RELWITHDEBINFO
CMAKE_CXX_FLAGS      Set the C++ flags.  Note: to prevent default
                     debug/release flags from being used, set the CMAKE_BUILD_TYPE=None
                     Also supported: CMAKE_CXX_FLAGS_DEBUG,
                     CMAKE_CXX_FLAGS_RELEASE, and CMAKE_CXX_FLAGS_RELWITHDEBINFO
CMAKE_INSTALL_PREFIX Set the install location (if using the optional install step)
INSTALL_NEXUS        Install Nexus alongside QMCPACK (if using the optional install step)
Additional QMCPACK build options
ENABLE_TIMERS          ON(default)/OFF. Enable fine-grained timers. Timers are on by default but at level coarse
                       to avoid potential slowdown in tiny systems.
                       For systems beyond tiny sizes (100+ electrons) there is no risk.
QE_BIN                 Location of Quantum ESPRESSO binaries including pw2qmcpack.x
RMG_BIN                Location of RMG binary (rmg-cpu)
QMC_DATA               Specify data directory for QMCPACK performance and integration tests
QMC_INCLUDE            Add extra include paths
QMC_EXTRA_LIBS         Add extra link libraries
QMC_BUILD_STATIC       ON/OFF(default). Add -static flags to build
QMC_SYMLINK_TEST_FILES Set to zero to require test files to be copied. Avoids space
                       saving default use of symbolic links for test files. Useful
                       if the build is on a separate filesystem from the source, as
                       required on some HPC systems.
BLAS/LAPACK related
BLA_VENDOR          If set, checks only the specified vendor, if not set checks all the possibilities.
                    See full list at https://cmake.org/cmake/help/latest/module/FindLAPACK.html
MKL_ROOT            Path to MKL libraries. Only necessary when auto-detection fails or overriding is desired.
Scalar and vector math functions
QMC_MATH_VENDOR     Select a vendor optimized library for scalar and vector math functions.
                    Providers are GENERIC INTEL_VML IBM_MASS AMD_LIBM
libxml2 related
LIBXML2_INCLUDE_DIR   Include directory for libxml2

LIBXML2_LIBRARY       Libxml2 library
HDF5 related
HDF5_PREFER_PARALLEL TRUE(default for MPI build)/FALSE, enables/disable parallel HDF5 library searching.
ENABLE_PHDF5         ON(default for parallel HDF5 library)/OFF, enables/disable parallel collective I/O.
FFTW related
FFTW_INCLUDE_DIRS   Specify include directories for FFTW
FFTW_LIBRARY_DIRS   Specify library directories for FFTW
CTest related
MPIEXEC_EXECUTABLE     Specify the mpi wrapper, e.g. srun, aprun, mpirun, etc.
MPIEXEC_NUMPROC_FLAG   Specify the number of mpi processes flag,
                       e.g. "-n", "-np", etc.
MPIEXEC_PREFLAGS       Flags to pass to MPIEXEC_EXECUTABLE directly before the executable to run.
Sanitizers Developer Options
ENABLE_SANITIZER link with the GNU or Clang sanitizer library for asan, ubsan, tsan or msan (default=none)
Clang address sanitizer library asan
Clang address sanitizer library ubsan
Clang thread sanitizer library tsan
Clang thread sanitizer library msan
See Sanitizer Libraries for more information.
Notes for OpenMP target offload to accelerators (experimental)
QMCPACK is currently being updated to support OpenMP target offload and obtain performance portability across GPUs from different vendors. This is currently an experimental feature and is not suitable for production. Additional implementation in QMCPACK as well as improvements in open-source and vendor compilers is required for production status to be reached. The following compilers have been verified:
LLVM Clang 15. Support NVIDIA GPUs.
-D ENABLE_OFFLOAD=ON
Clang and its downstream compilers support two extra options
OFFLOAD_TARGET for the offload target. default nvptx64-nvidia-cuda.
OFFLOAD_ARCH for the target architecture (sm_80, gfx906, ...) if not using the compiler default.
AMD ROCm/AOMP LLVM-based compilers. Support AMD GPUs.
-D ENABLE_OFFLOAD=ON -D OFFLOAD_TARGET=amdgcn-amd-amdhsa -D OFFLOAD_ARCH=gfx906
Intel oneAPI 2022.1.0 icx/icpx compilers. Support Intel GPUs.
-D ENABLE_OFFLOAD=ON -D OFFLOAD_TARGET=spir64
HPE Cray 13. It is derived from Clang and supports NVIDIA and AMD GPUs.
-D ENABLE_OFFLOAD=ON -D OFFLOAD_TARGET=nvptx64-nvidia-cuda -D OFFLOAD_ARCH=sm_80
OpenMP offload features can be used together with vendor specific code paths to maximize QMCPACK performance. Some new CUDA functionality has been implemented to improve performance on NVIDIA GPUs in conjunction with the offload code paths: For example, using Clang 14 on Summit.
-D ENABLE_OFFLOAD=ON -D ENABLE_CUDA=ON -D CMAKE_CUDA_ARCHITECTURES=70
Similarly, HIP features can be enabled in conjunction with the offload code path to improve performance on AMD GPUs.
-D ENABLE_OFFLOAD=ON -D ENABLE_CUDA=ON -D QMC_CUDA2HIP=ON -DHIP_ARCH=gfx906
Similarly, SYCL features can be enabled in conjunction with the offload code path to improve performance on Intel GPUs.
-D ENABLE_OFFLOAD=ON -D ENABLE_SYCL=ON
Installation from CMake
Installation is optional. The QMCPACK executable can be run from the bin directory in the build location.
If the install step is desired, run the make install command to install the QMCPACK executable, the converter,
and some additional executables.
Also installed is the qmcpack.settings file that records options used to compile QMCPACK.
Specify the CMAKE_INSTALL_PREFIX CMake variable during configuration to set the install location.
Role of QMC_DATA
QMCPACK includes a variety of optional performance and integration tests that use research quality wavefunctions to obtain meaningful performance and to more thoroughly test the code. The necessarily large input files are stored in the location pointed to by QMC_DATA (e.g., scratch or long-lived project space on a supercomputer). These multi-gigabyte files are not included in the source code distribution to minimize size. The tests are activated if CMake detects the files when configured. See tests/performance/NiO/README, tests/solids/NiO_afqmc/README, tests/performance/C-graphite/README, and tests/performance/C-molecule/README for details of the current tests and input files and to download them.
Currently the files must be downloaded via https://anl.box.com/s/yxz1ic4kxtdtgpva5hcmlom9ixfl3v3c.
The layout of current complete set of files is given below. If a file is missing, the appropriate performance test is skipped.
QMC_DATA/C-graphite/lda.pwscf.h5
QMC_DATA/C-molecule/C12-e48-pp.h5
QMC_DATA/C-molecule/C12-e72-ae.h5
QMC_DATA/C-molecule/C18-e108-ae.h5
QMC_DATA/C-molecule/C18-e72-pp.h5
QMC_DATA/C-molecule/C24-e144-ae.h5
QMC_DATA/C-molecule/C24-e96-pp.h5
QMC_DATA/C-molecule/C30-e120-pp.h5
QMC_DATA/C-molecule/C30-e180-ae.h5
QMC_DATA/C-molecule/C60-e240-pp.h5
QMC_DATA/NiO/NiO-fcc-supertwist111-supershift000-S1.h5
QMC_DATA/NiO/NiO-fcc-supertwist111-supershift000-S2.h5
QMC_DATA/NiO/NiO-fcc-supertwist111-supershift000-S4.h5
QMC_DATA/NiO/NiO-fcc-supertwist111-supershift000-S8.h5
QMC_DATA/NiO/NiO-fcc-supertwist111-supershift000-S16.h5
QMC_DATA/NiO/NiO-fcc-supertwist111-supershift000-S32.h5
QMC_DATA/NiO/NiO-fcc-supertwist111-supershift000-S64.h5
QMC_DATA/NiO/NiO-fcc-supertwist111-supershift000-S128.h5
QMC_DATA/NiO/NiO-fcc-supertwist111-supershift000-S256.h5
QMC_DATA/NiO/NiO_afm_fcidump.h5
QMC_DATA/NiO/NiO_afm_wfn.dat
QMC_DATA/NiO/NiO_nm_choldump.h5
Configure and build using CMake and make
To configure and build QMCPACK, move to build directory, run CMake, and make
cd build
cmake ..
make -j 8
As you will have gathered, CMake encourages “out of source” builds, where all the files for a specific build configuration reside in their own directory separate from the source files. This allows multiple builds to be created from the same source files, which is very useful when the file system is shared between different systems. You can also build versions with different settings (e.g., QMC_COMPLEX) and different compiler settings. The build directory does not have to be called build—use something descriptive such as build_machinename or build_complex. The “..” in the CMake line refers to the directory containing CMakeLists.txt. Update the “..” for other build directory locations.
Example configure and build
Set the environments (the examples below assume bash, Intel compilers, and MKL library)
export CXX=icpc
export CC=icc
export MKL_ROOT=/usr/local/intel/mkl/10.0.3.020
export HDF5_ROOT=/usr/local
export BOOST_ROOT=/usr/local/boost
export FFTW_HOME=/usr/local/fftw
Move to build directory, run CMake, and make
cd build
cmake -D CMAKE_BUILD_TYPE=Release ..
make -j 8
Build scripts
We recommended creating a helper script that contains the configure line for CMake. This is particularly useful when avoiding environment variables, packages are installed in custom locations, or the configure line is long or complex. In this case it is also recommended to add “rm -rf CMake*” before the configure line to remove existing CMake configure files to ensure a fresh configure each time the script is called. Deleting all the files in the build directory is also acceptable. If you do so we recommend adding some sanity checks in case the script is run from the wrong directory (e.g., checking for the existence of some QMCPACK files).
Some build script examples for different systems are given in the config directory. For example, on Cray systems these scripts might load the appropriate modules to set the appropriate programming environment, specific library versions, etc.
An example script build.sh is given below. It is much more complex than usually needed for comprehensiveness:
export CXX=mpic++
export CC=mpicc
export HDF5_ROOT=/opt/hdf5
export BOOST_ROOT=/opt/boost

rm -rf CMake*

cmake                                                \
  -D CMAKE_BUILD_TYPE=Debug                         \
  -D LIBXML2_INCLUDE_DIR=/usr/include/libxml2      \
  -D LIBXML2_LIBRARY=/usr/lib/x86_64-linux-gnu/libxml2.so \
  -D FFTW_INCLUDE_DIRS=/usr/include                 \
  -D FFTW_LIBRARY_DIRS=/usr/lib/x86_64-linux-gnu    \
  -D QMC_DATA=/projects/QMCPACK/qmc-data            \
  ..
Using vendor-optimized numerical libraries (e.g., Intel MKL)
Although QMC does not make extensive use of linear algebra, use of vendor-optimized libraries is strongly recommended for highest performance. BLAS routines are used in the Slater determinant update, the VMC wavefunction optimizer, and to apply orbital coefficients in local basis calculations. Vectorized math functions are also beneficial (e.g., for the phase factor computation in solid-state calculations). CMake is generally successful in finding these libraries, but specific combinations can require additional hints, as described in the following:
Using Intel MKL with non-Intel compilers
To use Intel MKL with, e.g. an MPICH wrapped gcc:
cmake \
  -DCMAKE_C_COMPILER=mpicc -DCMAKE_CXX_COMPILER=mpicxx \
  -DMKL_ROOT=YOUR_INTEL_MKL_ROOT_DIRECTORY \
  ..
MKL_ROOT is only necessary when MKL is not auto-detected successfully or a particular MKL installation is desired. YOUR_INTEL_MKL_ROOT_DIRECTORY is the directory containing the MKL bin, examples, and lib directories (etc.) and is often /opt/intel/mkl.
Serial or multithreaded library
Vendors might provide both serial and multithreaded versions of their libraries. Using the right version is critical to QMCPACK performance. QMCPACK makes calls from both inside and outside threaded regions. When being called from outside an OpenMP parallel region, the multithreaded version is preferred for the possibility of using all the available cores. When being called from every thread inside an OpenMP parallel region, the serial version is preferred for not oversubscribing the cores. Fortunately, nowadays the multithreaded versions of many vendor libraries (MKL, ESSL) are OpenMP aware. They use only one thread when being called inside an OpenMP parallel region. This behavior meets exactly both QMCPACK needs and thus is preferred. If the multithreaded version does not provide this feature of dynamically adjusting the number of threads, the serial version is preferred. In addition, thread safety is required no matter which version is used.
Cross compiling
Cross compiling is often difficult but is required on supercomputers with distinct host and compute processor generations or architectures. QMCPACK tried to do its best with CMake to facilitate cross compiling.
On a machine using a Cray programming environment, we rely on compiler wrappers provided by Cray to correctly set architecture-specific flags. Please also add
-DCMAKE_SYSTEM_NAME=CrayLinuxEnvironmentto cmake. The CMake configure log should indicate that a Cray machine was detected.If not on a Cray machine, by default we assume building for the host architecture (e.g., -xHost is added for the Intel compiler and -march=native is added for GNU/Clang compilers).
If -x/-ax or -march is specified by the user in CMAKE_C_FLAGS and CMAKE_CXX_FLAGS, we respect the user’s intention and do not add any architecture-specific flags.
The general strategy for cross compiling should therefore be to
manually set CMAKE_C_FLAGS and CMAKE_CXX_FLAGS for the target
architecture. Using make VERBOSE=1 is a useful way to check the
final compilation options. If on a Cray machine, selection of the
appropriate programming environment should be sufficient.
Installation instructions for common workstations and supercomputers
This section describes how to build QMCPACK on various common systems including multiple Linux distributions, Apple OS X, and various supercomputers. The examples should serve as good starting points for building QMCPACK on similar machines. For example, the software environment on modern Crays is very consistent. Note that updates to operating systems and system software might require small modifications to these recipes. See How to build the fastest executable version of QMCPACK for key points to check to obtain highest performance and Troubleshooting the installation for troubleshooting hints.
Installing on Ubuntu Linux or other apt-get–based distributions
The following is designed to obtain a working QMCPACK build on, for example, a student laptop, starting from a basic Linux installation with none of the developer tools installed. Fortunately, all the required packages are available in the default repositories making for a quick installation. Note that for convenience we use a generic BLAS. For production, a platform-optimized BLAS should be used.
sudo apt-get install cmake g++ openmpi-bin libopenmpi-dev libboost-dev
sudo apt-get install libatlas-base-dev liblapack-dev libhdf5-dev libxml2-dev fftw3-dev
export CXX=mpiCC
cd build
cmake ..
make -j 8
ls -l bin/qmcpack
For qmca and other tools to function, we install some Python libraries:
sudo apt-get install python-numpy python-matplotlib
Installing on CentOS Linux or other yum-based distributions
The following is designed to obtain a working QMCPACK build on, for example, a student laptop, starting from a basic Linux installation with none of the developer tools installed. CentOS 7 (Red Hat compatible) is using gcc 4.8.2. The installation is complicated only by the need to install another repository to obtain HDF5 packages that are not available by default. Note that for convenience we use a generic BLAS. For production, a platform-optimized BLAS should be used.
sudo yum install make cmake gcc gcc-c++ openmpi openmpi-devel fftw fftw-devel \
                  boost boost-devel libxml2 libxml2-devel
sudo yum install blas-devel lapack-devel atlas-devel
module load mpi
To set up repoforge as a source for the HDF5 package, go to http://repoforge.org/use. Install the appropriate up-to-date release package for your operating system. By default, CentOS Firefox will offer to run the installer. The CentOS 6.5 settings were still usable for HDF5 on CentOS 7 in 2016, but use CentOS 7 versions when they become available.
sudo yum install hdf5 hdf5-devel
To build QMCPACK:
module load mpi/openmpi-x86_64
which mpirun
# Sanity check; should print something like   /usr/lib64/openmpi/bin/mpirun
export CXX=mpiCC
cd build
cmake ..
make -j 8
ls -l bin/qmcpack
Installing on Mac OS X using Macports
These instructions assume a fresh installation of macports and use the gcc 10.2 compiler.
Follow the Macports install instructions at https://www.macports.org/.
Install Xcode and the Xcode Command Line Tools.
Agree to Xcode license in Terminal: sudo xcodebuild -license.
Install MacPorts for your version of OS X.
We recommend to make sure macports is updated:
sudo port -v selfupdate # Required for macports first run, recommended in general
sudo port upgrade outdated # Recommended
Install the required tools. For thoroughness we include the current full set of python dependencies. Some of the tests will be skipped if not all are available.
sudo port install gcc11
sudo port select gcc mp-gcc11
sudo port install openmpi-gcc11
sudo port select --set mpi openmpi-gcc11-fortran

sudo port install fftw-3 +gcc11
sudo port install libxml2
sudo port install cmake
sudo port install boost +gcc11
sudo port install hdf5 +gcc11

sudo port install python310
sudo port select --set python python310
sudo port select --set python3 python310
sudo port install py310-numpy +gcc11
sudo port select --set cython cython310
sudo port install py310-scipy +gcc11
sudo port install py310-h5py +gcc11
sudo port install py310-pandas
sudo port install py310-lxml
sudo port install py310-matplotlib  #For graphical plots with qmca
QMCPACK build:
cd build
cmake -DCMAKE_C_COMPILER=mpicc -DCMAKE_CXX_COMPILER=mpiCXX ..
make -j 4 # Adjust for available core count
ls -l bin/qmcpack
Run the deterministic tests:
ctest -R deterministic
This recipe was verified on February 28, 2022, on a Mac running OS X 11.6.4 “Big Sur”.
Installing on Mac OS X using Homebrew (brew)
Homebrew is a package manager for OS X that provides a convenient route to install all the QMCPACK dependencies. The following recipe will install the latest available versions of each package. This was successfully tested under OS X 10.15.7 “Catalina” on October 26, 2020.
Install Homebrew from http://brew.sh/:
/usr/bin/ruby -e "$(curl -fsSL
  https://raw.githubusercontent.com/Homebrew/install/master/install)"
Install the prerequisites:
brew install gcc # 10.2.0 when tested
brew install openmpi
brew install cmake
brew install fftw
brew install boost
brew install hdf5
export OMPI_CC=gcc-10
export OMPI_CXX=g++-10
Configure and build QMCPACK:
cmake -DCMAKE_C_COMPILER=/usr/local/bin/mpicc \
      -DCMAKE_CXX_COMPILER=/usr/local/bin/mpicxx ..
make -j 6 # Adjust for available core count
ls -l bin/qmcpack
Run the deterministic tests
ctest -R deterministic
Installing on ALCF Theta, Cray XC40
Theta is a 9.65 petaflops system manufactured by Cray with 3,624 compute nodes. Each node features a second-generation Intel Xeon Phi 7230 processor and 192 GB DDR4 RAM.
export CRAYPE_LINK_TYPE=dynamic
module load cmake/3.20.4
module unload cray-libsci
module load cray-hdf5-parallel
module load gcc/8.3.0   # Make C++ 14 standard library available to the Intel compiler
export BOOST_ROOT=/soft/libraries/boost/1.64.0/intel
cmake -DCMAKE_SYSTEM_NAME=CrayLinuxEnvironment ..
make -j 24
ls -l bin/qmcpack
Installing on ALCF Polaris
Polaris is a HPE Apollo Gen10+ based 44 petaflops system.
Each node features a AMD EPYC 7543P CPU and 4 NVIDIA A100 GPUs.
A build recipe for Polaris can be found at <qmcpack_source>/config/build_alcf_polaris_Clang.sh
Installing on ORNL OLCF Summit
Summit is an IBM system at the ORNL OLCF built with IBM Power System AC922 nodes. They have two IBM Power 9 processors and six NVIDIA Volta V100 accelerators.
Building QMCPACK
Note that these build instructions are preliminary as the software environment is subject to change. As of December 2018, the IBM XL compiler does not support C++14, so we currently use the gnu compiler.
For ease of reproducibility we provide build scripts for Summit.
cd qmcpack
./config/build_olcf_summit.sh
ls bin
Building Quantum ESPRESSO
We provide a build script for the v6.4.1 release of Quantum ESPRESSO (QE). The following can be used to build a CPU version of QE on Summit, placing the script in the external_codes/quantum_espresso directory.
cd external_codes/quantum_espresso
./build_qe_olcf_summit.sh
Note that performance is not yet optimized although vendor libraries are used. Alternatively, the wavefunction files can be generated on another system and the converted HDF5 files copied over.
Installing on NERSC Cori, Haswell Partition, Cray XC40
Cori is a Cray XC40 that includes 16-core Intel “Haswell” nodes installed at NERSC. In the following example, the source code is cloned in $HOME/qmc/git_QMCPACK and QMCPACK is built in the scratch space.
mkdir $HOME/qmc
mkdir $HOME/qmc/git_QMCPACK
cd $HOME/qmc_git_QMCPACK
git clone https://github.com/QMCPACK/qmcpack.git
cd qmcpack
git checkout v3.7.0 # Edit for desired version
export CRAYPE_LINK_TYPE=dynamic
module unload cray-libsci
module load boost/1.70.0
module load cray-hdf5-parallel
module load cmake/3.14.4
module load gcc/8.3.0 # Make C++ 14 standard library available to the Intel compiler
cd $SCRATCH
mkdir build_cori_hsw
cd build_cori_hsw
cmake -DQMC_SYMLINK_TEST_FILES=0 -DCMAKE_SYSTEM_NAME=CrayLinuxEnvironment $HOME/qmc/git_QMCPACK/qmcpack/
nice make -j 8
ls -l bin/qmcpack
When the preceding was tested on June 15, 2020, the following module and software versions were present:
build_cori_hsw> module list
Currently Loaded Modulefiles:
1) modules/3.2.11.4                                 13) xpmem/2.2.20-7.0.1.1_4.8__g0475745.ari
2) nsg/1.2.0                                        14) job/2.2.4-7.0.1.1_3.34__g36b56f4.ari
3) altd/2.0                                         15) dvs/2.12_2.2.156-7.0.1.1_8.6__g5aab709e
4) darshan/3.1.7                                    16) alps/6.6.57-7.0.1.1_5.10__g1b735148.ari
5) intel/19.0.3.199                                 17) rca/2.2.20-7.0.1.1_4.42__g8e3fb5b.ari
6) craype-network-aries                             18) atp/2.1.3
7) craype/2.6.2                                     19) PrgEnv-intel/6.0.5
8) udreg/2.3.2-7.0.1.1_3.29__g8175d3d.ari           20) craype-haswell
9) ugni/6.0.14.0-7.0.1.1_7.32__ge78e5b0.ari         21) cray-mpich/7.7.10
10) pmi/5.0.14                                      22) craype-hugepages2M
11) dmapp/7.1.1-7.0.1.1_4.43__g38cf134.ari          23) gcc/8.3.0
12) gni-headers/5.0.12.0-7.0.1.1_6.27__g3b1768f.ari 24) cmake/3.14.4
The following slurm job file can be used to run the tests:
#!/bin/bash
#SBATCH --qos=debug
#SBATCH --time=00:10:00
#SBATCH --nodes=1
#SBATCH --tasks-per-node=32
#SBATCH --constraint=haswell
echo --- Start `date`
echo --- Working directory: `pwd`
ctest -VV -R deterministic
echo --- End `date`
Installing on NERSC Cori, Xeon Phi KNL partition, Cray XC40
Cori is a Cray XC40 that includes Intel Xeon Phi Knight’s Landing (KNL) nodes. The following build recipe ensures that the code generation is appropriate for the KNL nodes. The source is assumed to be in $HOME/qmc/git_QMCPACK/qmcpack as per the Haswell example.
export CRAYPE_LINK_TYPE=dynamic
module swap craype-haswell craype-mic-knl # Only difference between Haswell and KNL recipes
module unload cray-libsci
module load boost/1.70.0
module load cray-hdf5-parallel
module load cmake/3.14.4
module load gcc/8.3.0 # Make C++ 14 standard library available to the Intel compiler
cd $SCRATCH
mkdir build_cori_knl
cd build_cori_knl
cmake -DQMC_SYMLINK_TEST_FILES=0 -DCMAKE_SYSTEM_NAME=CrayLinuxEnvironment $HOME/qmc/git_QMCPACK/qmcpack/
nice make -j 8
ls -l bin/qmcpack
When the preceding was tested on June 15, 2020, the following module and software versions were present:
build_cori_knl> module list
  Currently Loaded Modulefiles:
  1) modules/3.2.11.4                                 13) xpmem/2.2.20-7.0.1.1_4.8__g0475745.ari
  2) nsg/1.2.0                                        14) job/2.2.4-7.0.1.1_3.34__g36b56f4.ari
  3) altd/2.0                                         15) dvs/2.12_2.2.156-7.0.1.1_8.6__g5aab709e
  4) darshan/3.1.7                                    16) alps/6.6.57-7.0.1.1_5.10__g1b735148.ari
  5) intel/19.0.3.199                                 17) rca/2.2.20-7.0.1.1_4.42__g8e3fb5b.ari
  6) craype-network-aries                             18) atp/2.1.3
  7) craype/2.6.2                                     19) PrgEnv-intel/6.0.5
  8) udreg/2.3.2-7.0.1.1_3.29__g8175d3d.ari           20) craype-mic-knl
  9) ugni/6.0.14.0-7.0.1.1_7.32__ge78e5b0.ari         21) cray-mpich/7.7.10
 10) pmi/5.0.14                                       22) craype-hugepages2M
 11) dmapp/7.1.1-7.0.1.1_4.43__g38cf134.ari           23) gcc/8.3.0
 12) gni-headers/5.0.12.0-7.0.1.1_6.27__g3b1768f.ari  24) cmake/3.14.4
Installing on systems with ARMv8-based processors
The following build recipe was verified using the ‘Arm Compiler for HPC’ on the ANL JLSE Comanche system with Cavium ThunderX2 processors on November 6, 2018.
# load armclang compiler
module load Generic-AArch64/RHEL/7/arm-hpc-compiler/18.4
# load Arm performance libraries
module load ThunderX2CN99/RHEL/7/arm-hpc-compiler-18.4/armpl/18.4.0
# define path to pre-installed packages
export HDF5_ROOT=</path/to/hdf5/install/>
export BOOST_ROOT=</path/to/boost/install> # header-only, no need to build
Then using the following command:
mkdir build_armclang
cd build_armclang
cmake -DCMAKE_C_COMPILER=armclang -DCMAKE_CXX_COMPILER=armclang++ -DQMC_MPI=0 \
    -DLAPACK_LIBRARIES="-L$ARMPL_DIR/lib -larmpl_mp" \
    -DFFTW_INCLUDE_DIR="$ARMPL_DIR/include" \
    -DFFTW_LIBRARIES="$ARMPL_DIR/lib/libarmpl_mp.a" \
    ..
make -j 56
Note that armclang is recognized as an ‘unknown’ compiler by CMake v3.13* and below. In this case, we need to force it as clang to apply necessary flags. To do so, pass the following additionals option to CMake:
-DCMAKE_C_COMPILER_ID=Clang -DCMAKE_CXX_COMPILER_ID=Clang \
-DCMAKE_CXX_COMPILER_VERSION=5.0 -DCMAKE_CXX_STANDARD_COMPUTED_DEFAULT=98 \
Installing on Windows
Install the Windows Subsystem for Linux and Bash on Windows. Open a bash shell and follow the install directions for Ubuntu in Installing on Ubuntu Linux or other apt-get–based distributions.
Installing via Spack
Spack is a package manager for scientific software. One of the primary goals of Spack is to reduce the barrier for users to install scientific software. Spack is intended to work on everything from laptop computers to high-end supercomputers. More information about Spack can be found at https://spack.readthedocs.io/en/latest. The major advantage of installation with Spack is that all dependencies are automatically built, potentially including all the compilers and libraries, and different versions of QMCPACK can easily coexist with each other. The QMCPACK Spack package also knows how to automatically build and patch QE. In principle, QMCPACK can be installed with a single Spack command.
Known limitations
The QMCPACK Spack package inherits the limitations of the underlying
Spack infrastructure and its dependencies. The main limitation is that
installation can fail when building a dependency such as HDF5, MPICH,
etc. For spack install qmcpack to succeed, it is very
important to leverage preinstalled packages on your computer or
supercomputer. The other frequently encountered challenge is that the
compiler configuration is nonintuitive. This is especially the case
with the Intel compiler. If you encounter any difficulties, we
recommend testing the Spack compiler configuration on a simpler
package, e.g. HDF5.
Here are some additional limitations that new users should be aware of:
CUDA support in Spack still has some limitations. It will not catch the most recent compiler-CUDA conflicts.
The Intel compiler must find a recent and compatible GCC compiler in its path or one must be explicitly set with the
-gcc-nameand-gxx-nameflags in yourcompilers.yaml.Cross-compilation is non-intuitive. If the host OS and target OS are the same, but only the processors differ, you will just need to add the
target=<target CPU>. However, if the host OS is different from the target OS and you will need to addos=<target OS>. If both the OS and CPU differ between host and target, you will need to set thearch=<platform string>. For more information, see: https://spack.readthedocs.io/en/latest/basic_usage.html?highlight=cross%20compilation#architecture-specifiers
Setting up the Spack environment
Begin by cloning Spack from GitHub and configuring your shell as described at https://spack.readthedocs.io/en/latest/getting_started.html.
The goal of the next several steps is to set up the Spack environment
for building. First, we highly recommend limiting the number of build jobs to
a reasonable value for your machine. This can be
accomplished by modifying your ~/.spack/config.yaml file as follows:
config:
  build_jobs: 16
Make sure any existing compilers are properly detected. For many architectures, compilers are properly detected with no additional effort.
your-laptop> spack compilers
==> Available compilers
-- gcc sierra-x86_64 --------------------------------------------
gcc@7.2.0  gcc@6.4.0  gcc@5.5.0  gcc@4.9.4  gcc@4.8.5  gcc@4.7.4  gcc@4.6.4
However, if your compiler is not automatically detected, it is straightforward to add one:
your-laptop> spack compiler add <path-to-compiler>
The Intel (“classic”) compiler and other commercial compilers may
require extra environment variables to work properly. If you have an
module environment set-up by your system administrators, it is
recommended that you set the module name in
~/.spack/linux/compilers.yaml. Here is an example for the
Intel compiler:
- compiler:
  environment:{}
  extra_rpaths:  []
  flags: {}
  modules:
  - intel/18.0.3
  operating_system: ubuntu14.04
  paths:
    cc: /soft/com/packages/intel/18/u3/compilers_and_libraries_2018.3.222/linux/bin/intel64/icc
    cxx: /soft/com/packages/intel/18/u3/compilers_and_libraries_2018.3.222/linux/bin/intel64/icpc
    f77: /soft/com/packages/intel/18/u3/compilers_and_libraries_2018.3.222/linux/bin/intel64/ifort
    fc: /soft/com/packages/intel/18/u3/compilers_and_libraries_2018.3.222/linux/bin/intel64/ifort
  spec: intel@18.0.3
  target: x86_64
If a module is not available, you will have to set-up the environment variables manually:
- compiler:
  environment:
    set:
      INTEL_LICENSE_FILE: server@national-lab.doe.gov
  extra_rpaths:
  ['/soft/com/packages/intel/18/u3/compilers_and_libraries_2018.3.222/linux/compiler/lib/intel64',
  '/soft/apps/packages/gcc/gcc-6.2.0/lib64']
  flags:
    cflags: -gcc-name=/soft/apps/packages/gcc/gcc-6.2.0/bin/gcc
    fflags: -gcc-name=/soft/apps/packages/gcc/gcc-6.2.0/bin/gcc
    cxxflags: -gxx-name=/soft/apps/packages/gcc/gcc-6.2.0/bin/g++
  modules: []
  operating_system: ubuntu14.04
  paths:
    cc: /soft/com/packages/intel/18/u3/compilers_and_libraries_2018.3.222/linux/bin/intel64/icc
    cxx: /soft/com/packages/intel/18/u3/compilers_and_libraries_2018.3.222/linux/bin/intel64/icpc
    f77: /soft/com/packages/intel/18/u3/compilers_and_libraries_2018.3.222/linux/bin/intel64/ifort
    fc: /soft/com/packages/intel/18/u3/compilers_and_libraries_2018.3.222/linux/bin/intel64/ifort
  spec: intel@18.0.3
  target: x86_64
This last step is the most troublesome. Pre-installed packages are not
automatically detected. If vendor optimized libraries are already
installed, you will need to manually add them to your
~/.spack/packages.yaml. For example, this works on Mac OS X
for the Intel MKL package.
your-laptop> cat \~/.spack/packages.yaml
packages:
  intel-mkl:
      paths:
          intel-mkl@2018.0.128: /opt/intel/compilers_and_libraries_2018.0.104/mac/mkl
      buildable: False
Some trial-and-error might be involved to set the directories correctly. If you do not include enough of the tree path, Spack will not be able to register the package in its database. More information about system packages can be found at http://spack.readthedocs.io/en/latest/getting_started.html#system-packages.
Beginning with QMCPACK v3.9.0, Python 3.x is required. However,
installing Python with a compiler besides GCC is tricky. We recommend
leveraging your local Python installation by adding an entry in
~/.spack/packages.yaml:
packages:
  python:
     modules:
       python@3.7.4: anaconda3/2019.10
Or if a module is not available
packages:
  python:
     paths:
        python@3.7.4: /nfs/gce/software/custom/linux-ubuntu18.04-x86_64/anaconda3/2019.10/bin/python
   buildable: False
Building QMCPACK
The QMCPACK Spack package has a number of variants to support different compile time options and different versions of the application. A full list can be displayed by typing:
your laptop> spack info qmcpack
CMakePackage:   qmcpack

Description:
  QMCPACK, is a modern high-performance open-source Quantum Monte Carlo
  (QMC) simulation code.

Homepage: http://www.qmcpack.org/

Tags:
  ecp  ecp-apps

Preferred version:
  3.11.0     [git] https://github.com/QMCPACK/qmcpack.git at tag v3.11.0

Safe versions:
  develop    [git] https://github.com/QMCPACK/qmcpack.git
  3.11.0     [git] https://github.com/QMCPACK/qmcpack.git at tag v3.11.0
  3.10.0     [git] https://github.com/QMCPACK/qmcpack.git at tag v3.10.0
  3.9.2      [git] https://github.com/QMCPACK/qmcpack.git at tag v3.9.2
  3.9.1      [git] https://github.com/QMCPACK/qmcpack.git at tag v3.9.1
  3.9.0      [git] https://github.com/QMCPACK/qmcpack.git at tag v3.9.0
  3.8.0      [git] https://github.com/QMCPACK/qmcpack.git at tag v3.8.0
  3.7.0      [git] https://github.com/QMCPACK/qmcpack.git at tag v3.7.0
  3.6.0      [git] https://github.com/QMCPACK/qmcpack.git at tag v3.6.0
  3.5.0      [git] https://github.com/QMCPACK/qmcpack.git at tag v3.5.0
  3.4.0      [git] https://github.com/QMCPACK/qmcpack.git at tag v3.4.0
  3.3.0      [git] https://github.com/QMCPACK/qmcpack.git at tag v3.3.0
  3.2.0      [git] https://github.com/QMCPACK/qmcpack.git at tag v3.2.0
  3.1.1      [git] https://github.com/QMCPACK/qmcpack.git at tag v3.1.1
  3.1.0      [git] https://github.com/QMCPACK/qmcpack.git at tag v3.1.0

Variants:
  Name [Default]          Allowed values          Description
  ====================    ====================    =============================

  afqmc [off]             on, off                 Install with AFQMC support.
                                                  NOTE that if used in
                                                  combination with CUDA, only
                                                  AFQMC will have CUDA.
  build_type [Release]    Debug, Release,         The build type to build
                          RelWithDebInfo
  complex [off]           on, off                 Build the complex (general
                                                  twist/k-point) version
  cuda [off]              on, off                 Build with CUDA
  cuda_arch [none]        none, 53, 20, 62,       CUDA architecture
                          60, 61, 50, 75, 70,
                          72, 32, 52, 30, 35
  da [off]                on, off                 Install with support for basic
                                                  data analysis tools
  gui [off]               on, off                 Install with Matplotlib (long
                                                  installation time)
  mixed [off]             on, off                 Build the mixed precision
                                                  (mixture of single and double
                                                  precision) version for gpu and
                                                  cpu
  mpi [on]                on, off                 Build with MPI support
  phdf5 [on]              on, off                 Build with parallel collective
                                                  I/O
  ppconvert [off]         on, off                 Install with pseudopotential
                                                  converter.
  qe [on]                 on, off                 Install with patched Quantum
                                                  Espresso 6.4.0
  timers [off]            on, off                 Build with support for timers

Installation Phases:
  cmake    build    install

Build Dependencies:
  blas  boost  cmake  cuda  fftw-api  hdf5  lapack  libxml2  mpi  python

Link Dependencies:
  blas  boost  cuda  fftw-api  hdf5  lapack  libxml2  mpi  python

Run Dependencies:
  py-matplotlib  py-numpy  quantum-espresso

Virtual Packages:
  None
For example, to install the complex-valued version of QMCPACK in mixed-precision use:
your-laptop> spack install qmcpack+mixed+complex%gcc@7.2.0 ^intel-mkl
where
%gcc@7.2.0
specifies the compiler version to be used and
^intel-mkl
specifies that the Intel MKL should be used as the BLAS and LAPACK
provider. The ^ symbol indicates the the package to the right of the
symbol should be used to fulfill the dependency needed by the installation.
It is also possible to run the QMCPACK regression tests as part of the installation process, for example:
your-laptop> spack install --test=root qmcpack+mixed+complex%gcc@7.2.0 ^intel-mkl
will run the unit and deterministic tests. The current behavior of the QMCPACK Spack package is to complete the install as long as all the unit tests pass. If the deterministic tests fail, a warning is issued at the command prompt.
For CUDA, you will need to specify and extra cuda_arch
parameter otherwise, it will default to cuda_arch=61.
your-laptop> spack install qmcpack+cuda%intel@18.0.3 cuda_arch=61 ^intel-mkl
Due to limitations in the Spack CUDA package, if your compiler and CUDA combination conflict, you will need to set a specific version of CUDA that is compatible with your compiler on the command line. For example,
your-laptop> spack install qmcpack+cuda%intel@18.0.3 cuda_arch=61 ^cuda@10.0.130 ^intel-mkl
Loading QMCPACK into your environment
If you already have modules set-up in your environment, the Spack modules will be detected automatically. Otherwise, Spack will not automatically find the additional packages. A few additional steps are needed. Please see the main Spack documentation for additional details: https://spack.readthedocs.io/en/latest/module_file_support.html.
Dependencies that need to be compiled with GCC
Failing to compile a QMCPACK dependency is the most common reason that a Spack build fails. We recommend that you compile the following dependencies with GCC:
For MPI, using MPICH as the provider, try:
your-laptop> spack install qmcpack%intel@18.0.3 ^boost%gcc ^pkgconf%gcc ^perl%gcc ^libpciaccess%gcc ^cmake%gcc ^findutils%gcc ^m4%gcc
For serial,
your-laptop> spack install qmcpack~mpi%intel@18.0.3 ^boost%gcc ^pkgconf%gcc ^perl%gcc ^cmake%gcc
Installing QMCPACK with Spack on Linux
Spack works robustly on the standard flavors of Linux (Ubuntu, CentOS, Ubuntu, etc.) using GCC, Clang, NVHPC, and Intel compilers.
Installing QMCPACK with Spack on Mac OS X
Spack works on Mac OS X but requires installation of a few packages using Homebrew. You will need to install at minimum the GCC compilers, CMake, and pkg-config. The Intel compiler for Mac on OS X is not well supported by Spack packages and will most likely lead to a compile time failure in one of QMCPACK’s dependencies.
Installing QMCPACK with Spack on Cray Supercomputers
Spack now works with the Cray environment. To leverage the installed
Cray environment, both a compilers.yaml and
packages.yaml file should be provided by the supercomputing
facility. Additionally, Spack packages compiled by the facility can be
reused by chaining Spack installations
https://spack.readthedocs.io/en/latest/chain.html.
Installing Quantum-ESPRESSO with Spack
More information about the QE Spack package can be obtained directly from Spack
spack info quantum-espresso
There are many variants available for QE, most, but not all, are compatible with QMCPACK patch. Here is a minimalistic example of the Spack installation command that needs to be invoked:
your-laptop> spack install quantum-espresso+qmcpack~patch@6.7%gcc hdf5=parallel
The ~ decorator means deactivate the patch
variant. This refers not to the QMCPACK patch, but to the upstream
patching that is present for some versions of QE. These upstream QE
patches fix specific critical autoconf/configure fixes. Unfortunately,
some of these QE upstream patches are incompatible with the QMCPACK
patch. Note that the Spack package will prevent you from installing
incompatible variants and will emit an error message explaining the
nature of the incompatibility.
A serial (no MPI) installation is also available, but the Spack installation command is non-intuitive for Spack newcomers:
your-laptop> spack install quantum-espresso+qmcpack~patch~mpi~scalapack@6.7%gcc hdf5=serial
QE Spack package is well tested with GCC and Intel compilers, but will not work with the NVHPC compiler or in a cross-compile environment.
Reporting Bugs
Bugs with the QMCPACK Spack package should be filed at the main GitHub Spack repo https://github.com/spack/spack/issues.
In the GitHub issue, include @naromero77 to get the attention
of our developer.
Testing and validation of QMCPACK
We strongly encourage running the included tests each time QMCPACK is built. A range of unit and integration tests ensure that the code behaves as expected and that results are consistent with known-good mean-field, quantum chemical, and historical QMC results.
The tests include the following:
Unit tests: to check fundamental behavior. These should always pass.
Stochastic integration tests: to check computed results from the Monte Carlo methods. These might fail statistically, but rarely because of the use of three sigma level statistics. These tests are further split into “short” tests, which have just sufficient length to have valid statistics, and “long” tests, to check behavior to higher statistical accuracy.
Converter tests: to check conversion of trial wavefunctions from codes such as QE and GAMESS to QMCPACK’s formats. These should always pass.
Workflow tests: in the case of QE, we test the entire cycle of DFT calculation, trial wavefunction conversion, and a subsequent VMC run.
Performance: to help performance monitoring. Only the timing of these runs is relevant.
The test types are differentiated by prefixes in their names, for example, short-LiH_dimer_ae_vmc_hf_noj_16-1 indicates a short VMC test
for the LiH dime.
QMCPACK also includes tests for developmental features and features that are unsupported on certain platforms. To indicate these, tests that are unstable are labeled with the CTest label “unstable.” For example, they are unreliable, unsupported, or known to fail from partial implementation or bugs.
When installing QMCPACK you should run at least the unit tests:
ctest -R unit
These tests take only a few seconds to run. All should pass. A failure here could indicate a major problem with the installation.
A wider range of deterministic integration tests are being developed. The goal is to test much more of QMCPACK than the unit tests do and to do so in a manner that is reproducible across platforms. All of these should eventually pass 100% reliably and quickly. At present, some fail on some platforms and for certain build types.
ctest -R deterministic -LE unstable
If time allows, the “short” stochastic tests should also be run. The short tests take a few minutes each on a 16-core machine—about 1 hour total depending on the platform. You can run these tests using the following command in the build directory:
ctest -R short -LE unstable  # Run the tests with "short" in their name.
                             # Exclude any known unstable tests.
The output should be similar to the following:
Test project build_gcc
    Start  1: short-LiH_dimer_ae-vmc_hf_noj-16-1
1/44 Test  #1: short-LiH_dimer_ae-vmc_hf_noj-16-1 ..............  Passed   11.20 sec
    Start  2: short-LiH_dimer_ae-vmc_hf_noj-16-1-kinetic
2/44 Test  #2: short-LiH_dimer_ae-vmc_hf_noj-16-1-kinetic ......  Passed    0.13 sec
..
42/44 Test #42: short-monoO_1x1x1_pp-vmc_sdj-1-16 ...............  Passed   10.02 sec
    Start 43: short-monoO_1x1x1_pp-vmc_sdj-1-16-totenergy
43/44 Test #43: short-monoO_1x1x1_pp-vmc_sdj-1-16-totenergy .....  Passed    0.08 sec
    Start 44: short-monoO_1x1x1_pp-vmc_sdj-1-16-samples
44/44 Test #44: short-monoO_1x1x1_pp-vmc_sdj-1-16-samples .......  Passed    0.08 sec

100% tests passed, 0 tests failed out of 44

Total Test time (real) = 167.14 sec
Note that the number of tests run varies between the standard, complex, and GPU compilations. These tests should pass with three sigma reliability. That is, they should nearly always pass, and when rerunning a failed test it should usually pass. Overly frequent failures suggest a problem that should be addressed before any scientific production.
The full set of tests consist of significantly longer versions of the short tests, as well as tests of the conversion utilities. The runs require several hours each for improved statistics and a much more stringent test of the code. To run all the tests, simply run CTest in the build directory:
ctest -LE unstable # Run all the stable tests. This will take several hours.
You can also run verbose tests, which direct the QMCPACK output to the standard output:
ctest -V -R short # Verbose short tests
The test system includes specific tests for the complex version of the code.
The input data files for the tests are located in the tests directory.
The system-level test directories are grouped into heg, molecules, and solids, with particular physical systems under each (for example molecules/H4_ae 1 ).
Under each physical system directory there might be tests for multiple QMC methods or parameter variations.
The numerical comparisons and test definitions are in the CMakeLists.txt file in each physical system directory.
If all the QMC tests fail it is likely
that the appropriate mpiexec (or mpirun, aprun, srun, jsrun) is not being
called or found. If the QMC runs appear to work but all the other
tests fail, it is possible that Python is not working on your system. We suggest checking some of the test console output in build/Testing/Temporary/LastTest.log
or the output files under build/tests/.
Note that because most of the tests are very small, consisting of only a few electrons, the performance is not representative of larger calculations. For example, although the calculations might fit in cache, there will be essentially no vectorization because of the small electron counts. These tests should therefore not be used for any benchmarking or performance analysis. Example runs that can be used for testing performance are described in Performance tests.
Deterministic and unit tests
QMCPACK has a set of deterministic tests, predominantly unit tests. All of these tests can be run with the following command (in the build directory):
ctest -R deterministic -LE unstable
These tests should always pass. Failure could indicate a major problem with the compiler, compiler settings, or a linked library that would give incorrect results.
The output should look similar to the following:
Test project qmcpack/build
    Start  1: unit_test_numerics
1/11 Test  #1: unit_test_numerics ...............   Passed    0.06 sec
    Start  2: unit_test_utilities
2/11 Test  #2: unit_test_utilities ..............   Passed    0.02 sec
    Start  3: unit_test_einspline
...
10/11 Test #10: unit_test_hamiltonian ............   Passed    1.88 sec
    Start 11: unit_test_drivers
11/11 Test #11: unit_test_drivers ................   Passed    0.01 sec

100% tests passed, 0 tests failed out of 11

Label Time Summary:
unit    =   2.20 sec

Total Test time (real) =   2.31 sec
Individual unit test executables can be found in build/tests/bin.
The source for the unit tests is located in the tests directory under each directory in src (e.g. src/QMCWavefunctions/tests).
See Unit Testing for more details about unit tests.
Integration tests with Quantum ESPRESSO
As described in Installing Quantum ESPRESSO and pw2qmcpack, it is possible to test entire workflows of trial wavefunction generation, conversion, and eventual QMC calculation. A patched QE must be installed so that the pw2qmcpack converter is available.
By adding -D QE_BIN=your_QE_binary_path in the CMake command line when building your QMCPACK, tests named with the “qe-”
prefix will be included in the test set of your build. If CMake finds pw2qmcpack.x and pw.x in the same location on the PATH,
these tests will also be activated. You can test the whole pw > pw2qmcpack > qmcpack workflow by
ctest -R qe
This provides a very solid test of the entire QMC toolchain for plane wave–generated wavefunctions.
Performance tests
Performance tests representative of real research runs are included in the tests/performance directory. They can be used for benchmarking, comparing machine performance, or assessing optimizations. This is in contrast to the majority of the conventional integration tests in which the particle counts are too small to be representative. Care is still needed to remove initialization, I/O, and compute a representative performance measure.
The CTest integration is sufficient to run the benchmarks and measure relative performance from version to version of QMCPACK and to assess proposed code changes. Performance tests are prefixed with “performance.” To obtain the highest performance on a particular platform, you must run the benchmarks in a standalone manner and tune thread counts, placement, walker count (etc.). This is essential to fairly compare different machines. Check with the developers if you are unsure of what is a fair change.
For the largest problem sizes, the initialization of spline orbitals might
take a large portion of overall runtime. When QMCPACK is run at scale,
the initialization is fast because it is fully
parallelized. However, the performance tests usually run on a single node.
Consider running QMCPACK once with save_coefs="yes" XML input tag
added to the line of ‘determinantset’ to save the converted spline
coefficients to the disk and load them for later runs in the same folder.
See 3D B-splines orbitals for more information.
The delayed update algorithm in Single determinant wavefunctions significantly changes the performance characteristics of QMCPACK. A parameter scan of the maximal number of delays specific to every architecture and problem size is required to achieve the best performance.
NiO performance tests
Follow the instructions in tests/performance/NiO/README to enable and run the NiO tests.
The NiO tests are for bulk supercells of varying size. The QMC runs consist of short blocks of (1) VMC
without drift (2) VMC with drift term included, and (3) DMC with
constant population. The tests use spline wavefunctions that must be
downloaded as described in the README file because of their large size. You
will need to set -DQMC_DATA=<full path to your data folder>
when running CMake as described in the README file.
Two sets of wavefunction are tested: spline orbitals with one- and two-body Jastrow functions and a more complex form with an additional three-body Jastrow function. The Jastrows are the same for each run and are not reoptimized, as might be done for research purposes. Runs in the hundreds of electrons up to low thousands of electrons are representative of research runs performed in 2017. The largest runs target future machines and require very large memory.
All system sizes in the table below will be tested as long as the corresponding h5 files are available in the data folder.
You may limit the maximal system size of tests by an atom count via -DQMC_PERFORMANCE_NIO_MAX_ATOMS=<number of atoms>.
Only tests with their atom counts below and equal to <number of atoms> are added to the performance tests.
Performance test name |
Historical name |
Atoms |
Electrons |
Electrons/spin |
|---|---|---|---|---|
performance-NiO-cpu-a32-e384 |
S8 |
32 |
384 |
192 |
performance-NiO-cpu-a64-e768 |
S16 |
64 |
768 |
384 |
performance-NiO-cpu-a128-e1536 |
S32 |
128 |
1536 |
768 |
performance-NiO-cpu-a256-e3072 |
S64 |
256 |
3072 |
1536 |
performance-NiO-cpu-a512-e6144 |
S128 |
512 |
6144 |
3072 |
performance-NiO-cpu-a1024-e12288 |
S256 |
1024 |
12288 |
6144 |
Troubleshooting tests
CTest reports briefly pass or fail of tests in printout and also collects all the standard outputs to help investigating how tests fail.
If the CTest execution is completed, look at Testing/Temporary/LastTest.log.
If you manually stop the testing (ctrl+c), look at Testing/Temporary/LastTest.log.tmp.
You can locate the failing tests by searching for the key word “Fail.”
Slow testing with OpenMPI
OpenMPI has a default binding policy that makes all the threads run on a single core during testing when there are two or fewer MPI ranks. This significantly increases testing time. If you are authorized to change the default setting, you can just add “hwloc_base_binding_policy=none” in /etc/openmpi/openmpi-mca-params.conf.
Automated testing of QMCPACK
The QMCPACK developers run automatic tests of QMCPACK on several different computer systems, many on a continuous basis. See the reports at https://cdash.qmcpack.org/CDash/index.php?project=QMCPACK. The combinations that are currently tested can be seen on CDash and are also listed in https://github.com/QMCPACK/qmcpack/blob/develop/README.md. They include GCC, Clang, Intel, and PGI compilers in combinations with various library versions and different MPI implementations. NVIDIA GPUs are also tested.
Building ppconvert, a pseudopotential format converter
QMCPACK includes a utility—ppconvert—to convert between different pseudopotential formats. Examples include effective core potential formats (in Gaussians), the UPF format used by QE, and the XML format used by QMCPACK itself. The utility also enables the atomic orbitals to be recomputed via a numerical density functional calculation if they need to be reconstructed for use in an electronic structure calculation. Use of ppconvert is an expert feature and discouraged for casual use: a poor choice of orbitals for the creation of projectors in UPF can introduce severe errors and inaccuracies.
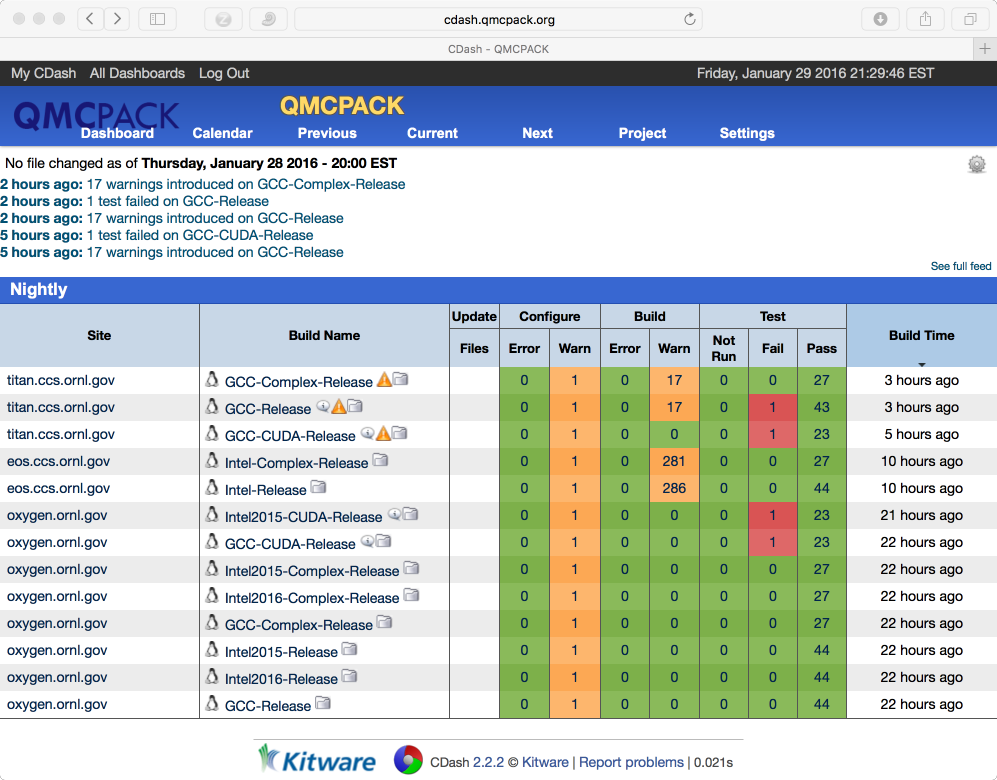
Fig. 2 Example test results for QMCPACK showing data for a workstation (Intel, GCC, both CPU and GPU builds) and for two ORNL supercomputers. In this example, four errors were found. This dashboard is accessible at https://cdash.qmcpack.org
Installing Quantum ESPRESSO and pw2qmcpack
For trial wavefunctions obtained in a plane-wave basis, we mainly support QE. Note that ABINIT and QBox were supported historically and could be reactivated.
QE stores wavefunctions in a nonstandard internal “save” format. To convert these to a conventional HDF5 format file we have developed a converter—pw2qmcpack—which is an add-on to the QE distribution.
Quantum ESPRESSO (<=6.8)
To simplify the process of patching QE we have developed a script that will automatically download and patch the source code. The patches are specific to each version. For example, to download and patch QE v6.3:
cd external_codes/quantum_espresso
./download_and_patch_qe6.3.sh
After running the patch, you must configure QE with the HDF5 capability enabled in either way:
If your system already has HDF5 installed with Fortran, use the -{}-with-hdf5 configuration option.
cd qe-6.3
./configure --with-hdf5=/opt/local   # Specify HDF5 base directory
Check the end of the configure output if HDF5 libraries are found properly. If not, either install a complete library or use the other scheme. If using a parallel HDF5 library, be sure to use the same MPI with QE as used to build the parallel HDF5 library.
Currently, HDF5 support in QE itself is preliminary. To enable use of pw2qmcpack but use the old non-HDF5 I/O within QE, replace
-D__HDF5with{-D__HDF5_C}in make.inc.
If your system has HDF5 with C only, manually edit make.inc by adding
-D__HDF5_Cand-DH5_USE_16_APIinDFLAGSand provide include and library path inIFLAGSandHDF5_LIB.
The complete process is described in external_codes/quantum_espresso/README.
Quantum ESPRESSO (6.7, 6.8 and 7.0)
After patching the QE source code like above, users may use CMake instead of configure to build QE with pw2qmcpack. Options needed to enable pw2qmcpack have been set ON by default. A HDF5 library installation with Fortran support is required.
mkdir build_mpi
cd build_mpi
cmake -DCMAKE_C_COMPILER=mpicc -DCMAKE_Fortran_COMPILER=mpif90 ..
make -j 16
Quantum ESPRESSO (>7.0)
Due to incorporation of pw2qmcpack as a plugin, there is no longer any need to patch QE.
Users may use upstream QE and activate the plugin by specifying -DQE_ENABLE_PLUGINS=pw2qmcpack at the CMake configure step.
Full QE CMake documentation can be found at
https://gitlab.com/QEF/q-e/-/wikis/Developers/CMake-build-system .
mkdir build_mpi
cd build_mpi
cmake -DCMAKE_C_COMPILER=mpicc -DCMAKE_Fortran_COMPILER=mpif90 -DQE_ENABLE_PLUGINS=pw2qmcpack ..
make -j 16
Testing QE after installation
Testing the QE to QMCPACK workflow after building QE and QMCPACK is highly recommended. See Integration tests with Quantum ESPRESSO and the testing section for more details.
How to build the fastest executable version of QMCPACK
To build the fastest version of QMCPACK we recommend the following:
Use the latest C++ compilers available for your system. Substantial gains have been made optimizing C++ in recent years.
Use a vendor-optimized BLAS library such as Intel MKL and AMD AOCL. Although QMC does not make extensive use of linear algebra, it is used in the VMC wavefunction optimizer to apply the orbital coefficients in local basis calculations and in the Slater determinant update.
Use a vector math library such as Intel VML. For periodic calculations, the calculation of the structure factor and Ewald potential benefit from vectorized evaluation of sin and cos. Currently we only autodetect Intel VML, as provided with MKL, but support for MASSV and AMD LibM is included via #defines. See, for example, src/Numerics/e2iphi.h. For large supercells, this optimization can gain 10% in performance.
Note that greater speedups of QMC calculations can usually be obtained by carefully choosing the required statistics for each investigation. That is, do not compute smaller error bars than necessary.
Troubleshooting the installation
Some tips to help troubleshoot installations of QMCPACK:
First, build QMCPACK on a workstation you control or on any system with a simple and up-to-date set of development tools. You can compare the results of CMake and QMCPACK on this system with any more difficult systems you encounter.
Use up-to-date development software, particularly a recent CMake.
Verify that the compilers and libraries you expect are being configured. It is common to have multiple versions installed. The configure system will stop at the first version it finds, which might not be the most recent. If this occurs, directly specify the appropriate directories and files (Configuration Options). For example,
cmake -DCMAKE_C_COMPILER=/full/path/to/mpicc -DCMAKE_CXX_COMPILER=/full/path/to/mpicxx ..
To monitor the compiler and linker settings, use a verbose build,
make
VERBOSE=1
. If an individual source file fails to compile you can experiment by hand using the output of the verbose build to reconstruct the full compilation line.
If you still have problems please post to the QMCPACK Google group with full details, or contact a developer.
Footnotes
- 1
The suffix “ae” is short for “all-electron,” and “pp” is short for “pseudopotential.”